Showing posts with label Paper Flower. Show all posts

Tuesday, January 15, 2013

Another Wedding Project!


Assalamualaikum,

The first wedding project in 2013 for Syafiqah and Shah's happiest day!

I would like to congratulate both of them and may the marriage will always be blessed by Allah and together forever until Jannah.

The signage was in A3 size and in vintage style with paper roses, quilling hearts and butterfly.


Thursday, September 20, 2012

Hantaran - Paper Flower

Today me will tell you about the preparations. Hantaran was my favorite part of them all. Why? Because it was 100% handmade! Seriously I'm officially feel proud of myself. The Orange, yellow and pink roses was made from crepe paper. The secret for making this beautiful paper roses was patience and determination. The results was indeed satisfying and according to what I have imagine before! HAPPY! 
The orange, pink and yellow paper flower!

          People always says that sharing is caring rite? Here are the tutorials for making these Paper Roses. Well, from the tutorial, the roses was made from normal paper but this technique can be applied to other type of paper too! I believe you can do it too because it was simple to make.

          Serious speaking, DIY stuff is far more cheaper. With a little bit of creativity and imagination you can turn up scraps to something wonderful, beautiful and amazing that may awe people who appreciate the creative things. These are the vendors which I bought all the supplies for making the hantarans:
  • Yen Riben at Semua House, Jalan TAR (pink and yellow crepe paper)
  • Cziplee Books and Stationery, Kajang (orange crepe paper )
  • SSF, Jalan Tar (white doily pattern fruit bowl and plate)
  • Kedai Bunga, Medan Idaman, Gombak (white and silver wire, ribbons, beads etc)
  • S&J Gift & Collection, Alpha Angle, Wangsa Maju (dark purple boxes)
  • Hinode Shop, Wangsa Walk (glass container)

          If I had more flower it would be even greater. Plus, if I had put pillow (nowadays tends) between the hantaran's tray and the flower/box it will look more superb. But it's okey. I have another preparation of the wedding next year. It looks like I have to gather more info and latest trends from now onward. Wah, boleh? hihi. I like to say thank again to my aunt for the fruits and songket arrangement. To fold the songket into fan figure, yup I really do not know how to do that. Also to Mak Su Kartinie for making the complicated and beautiful Tulip Sarawak Layered Cake (the only one can do it). Not forgetting Pija and Zaidiana for the fondant cake and manage to have the same colour palette. The cake was bought from Isabella Kek, Danau Kota. Lastly to Aunty Rose and Shai for the sweet smelled of jasmine of  the Sirih Junjung.

The arrangement of the hantarans.

Close up by Anat Photography. (Lagi sharp seyh berbanding taken from my camera)

The theme of blue from their side - Love the color and arrangement ( it looks more WOW if picture were waken  with the blue pillow!)

Tuesday, June 5, 2012

Thinking of You!


Now they have new owner and new home. 
Although it was simple but meaningful (I hope so).


Monday, May 7, 2012

{LovelyIdeas} Paper Roses


Seriously, I am so fond of paper and I have tonnes of colorful paper at my house. The appetite for paper are much more worst than food! While scrolling up and down into the web, I found this such an inspirational tutorial on how to make a paper roses...It was gorgeous and yet so simple. The tutorial was shown by Rachel Grace at Heart of Light. I copied the tutorial just in case I need it for future reference...huhu. Enjoy and be creative people!


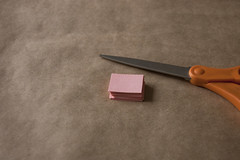
1. Cut the paper into squares 


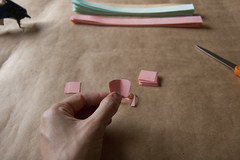
2. Fold the paper into half and trimmed into petal shape (the imperfect shape is ok!)


3. Once you have a nice pile of trimmed petals, start rolling them between your fingers. Form them into little tubes.


4. Roll the petal back up (over the glue) and hold for a few second so it can set up. This will be the center of the flower.


5. Repeat the same steps as with the second petal. You're holding the flower in your left hand, spreading out a new petal with the lower fingers and applying glue to the base corners.


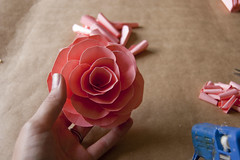
6. Growing flower. Continue to add more petals. You'll want the petals to flare out more and or as you work your way along. Eventually, you'll end up with a nice full flower.


7. There's really no exact finishing point. You can add fewer petals if you don't want your flower completely flat on the bottom or if you want it narrower. You can add more to make it extra full.